

The short answer (updated November 2026):
- To use a green screen, hang a smooth green backdrop behind you, light it evenly and record. Then key out the green in your editor and put any image in its place.
- Light the screen and yourself with separate lights. Adobe's green screen guide calls lighting them as one the biggest mistake you can make.
- Sit as far in front of the screen as your room allows. Adobe suggests 10 to 15 feet, which keeps green light off your shoulders and hair.
- Wear no green, turn off your camera's auto exposure, and clean up what's left with the keyer's spill and edge controls.
- No room for a screen? Zoom's virtual background and some recording studios can cut you out of an ordinary room instead.
You record at home, and the wall behind you is a bookshelf, a door and a stack of boxes. You want something cleaner back there, maybe in your brand colors. A green screen gets you there in six steps: a smooth screen, distance from it, separate light for it and for you, no green clothes, a locked camera and a keyer. The light is the hard part. Here are the steps, a floor plan for a spare room, a fix table for halos, shadows and wrinkles, and the no-screen option.
How to use a green screen in 6 steps
Here's the method in order. Each step gets its own section below the floor plan.
- Hang a smooth screen. Pull it tight so it shows one even shade of green.
- Sit well in front of it. Adobe's guide suggests 10 to 15 feet. Take what your room allows.
- Light the screen, then light yourself. Two soft lights on the screen, at least one more on you.
- Wear anything but green. Skip shiny jewelry too.
- Turn off your camera's auto settings. Lock exposure, white balance and focus so the green stays one shade.
- Key out the green. Click it with your editor's eyedropper, or key it live while you record. Then fine-tune spill and edges.
Step 1: hang a smooth screen you can leave up
Any flat green surface works if it shows one even shade. Apple's Final Cut Pro guide lists chroma key paint, cloth and paper sheets. It says the hard part is "a good, well-lit background that provides a uniform color to remove."
For a home office, a pull-up screen on its own frame is the easy pick. It stays taut and packs away. A fabric sheet costs less but needs clamps, and CapCut's help center lists a background that is "uneven, wrinkled, or poorly lit" as the first reason its chroma key fails. Check the care label before you iron anything. Elgato's quick start guide says not to iron its screen, because small wrinkles smooth out on their own.
Frame yourself on camera, check that green fills every edge behind you, and leave it up. In my video on creating content without becoming a full-time creator, the second part of the system is a recording station that's already set up, because "consistency isn't about becoming more disciplined, it's about removing enough friction that consistency becomes the default." A screen you rig from scratch every week is a screen you stop using.
Step 2: sit as far in front of the screen as the room allows
Distance is the cheapest fix in green screen work. It keeps green light from bouncing off the screen onto your shoulders and hair, which editors call green spill. And your shadow lands on the floor, not the screen. Zoom's help center asks for a background that is "a solid color with minimal shadows."
Adobe's green screen guide says to "aim for about 10 to 15 feet of distance between your subject and the screen." Most spare rooms can't give you that. Take every foot you can get.
Here's how it works out in the 12-foot room from the diagram. The screen takes a foot at the back wall, and your chair sits 6 feet in front of it. The desk and camera take 3 feet in front of you, which leaves 2 feet to walk around. That's well short of a studio, and it's fine. Most keyers in step 6 have a spill control for the green that still reaches you.
Step 3: light the screen first, then light yourself
Give the screen its own lights, and give yourself others. Adobe's guide is blunt: "The biggest mistake you can make with green screen work is lighting the screen and the subject as one."
The screen needs soft, even light across its whole surface. Production head Mitch Apley, quoted in the same guide, says it should be "as evenly lit as possible at about 40 to 50 percent luminance." Pros check it on a waveform monitor. At home, look through your camera for one flat shade of green. No bright spot in the middle, no dark corners.
That takes more than one light. Adobe warns that cheap kits often come with one or two lights "sufficient to light your subject only," which leaves a patchy background. Aim two soft lights at the screen and nothing else, each behind a diffuser or softbox.
Then light yourself from the front with soft light. Zoom's help center calls a three-point lighting setup ideal. If your new background has a window or a lamp in it, put your main light on the same side. Videographer Gerry Holtz, in Adobe's guide, calls a mismatch there "what kills a green screen composite." A hair light behind you adds "a sharper line between your subject and background."
Step 4: wear anything except green
Anything green on you disappears along with the screen. If someone shows up in a green tie, Adobe's guide warns, the keyer "will blast a hole through their chest." Near-greens count too. Apley has seen "khakis that are slightly greenish" turn semi-translucent.
That's why screens are green in the first place. Green "doesn't match any natural skin tone or hair color," so a keyer can remove it without taking pieces of you. Your hair and eyes still count. Zoom's help center says the screen color shouldn't match your shirt, hair or eye color.
Shine is the other problem. Adobe flags mirrored or reflective objects and suggests makeup powder for shine on your face or head.
Is green your brand color? Switch to a blue screen. Apple's iMovie guide says to record in front of a blue background if you're wearing green, and Adobe's guide says the same for a green prop. For the rest of what to wear and how to sit, read how to look natural on camera.
Step 5: turn off your camera's auto settings
A webcam is built to fix the room for you, and that fights the keyer. Logitech's support page says its cameras "have auto exposure that make the most of ambient lighting." Lean in, and the camera rebalances the picture and the green shifts shade. Adobe's After Effects help warns that if the lighting changes, "you may need to adjust keying controls for other frames."
So lock whatever your camera software lets you lock. Logitech's webcam settings guide says to set exposure by hand for streaming "to prevent shifts in brightness," to adjust white balance manually, and to set focus by hand "if you're going to be stationary while streaming or recording." Set all three with every light on, sitting in your chair. No switches? Close the blinds and rely on your own lights.
Give the camera plenty of light and the cleanest file it can make, too. Premiere's Ultra Key has a Pedestal control for noise "often caused by grainy or low-light footage," and Apple's Final Cut guide says to avoid a highly compressed format. Recording on a Mac? How to record yourself on a Mac covers the built-in camera and using an iPhone as a webcam.
Step 6: key out the green and drop in your new background
Keying means picking the green and making it see-through, so a new image shows behind you. Every major editor does it the same way: click the green with an eyedropper, then adjust the sliders for spill and edges.
| Editor | Where the keyer is | What to adjust after | Source |
|---|---|---|---|
| Premiere Pro | Video Effects > Keying > Ultra Key. Click the eyedropper next to Key Color, then the green. | Matte Generation, Matte Cleanup, Spill Suppression | Adobe Help |
| Final Cut Pro (Mac) | The Green Screen Keyer effect. Spill removal is on by default. | Strength, Spill Level, and Edges for hair | Apple Support |
| iMovie (iPhone, iPad, Mac) | Put the background clip in the timeline, add the green screen clip, then choose Green/Blue Screen. | Strength on iPhone and iPad. Softness and Clean-Up on a Mac. | Apple Support |
| CapCut (phone) | Tap the clip, then Edit > Remove BG > Chroma Key, and pick the green. | Intensity and Shadow, in small steps | CapCut Help |
Two habits make any keyer easier. Do your rough cut first, so you never polish frames you'll delete. Adobe recommends it too, and how to edit talking-head videos faster covers the cut. Then set the key on your hardest frame. Adobe's After Effects help says to tune it on the frame with the finest detail, like hair, and the easy frames follow. Editing in CapCut? Here's what its free and paid plans include.
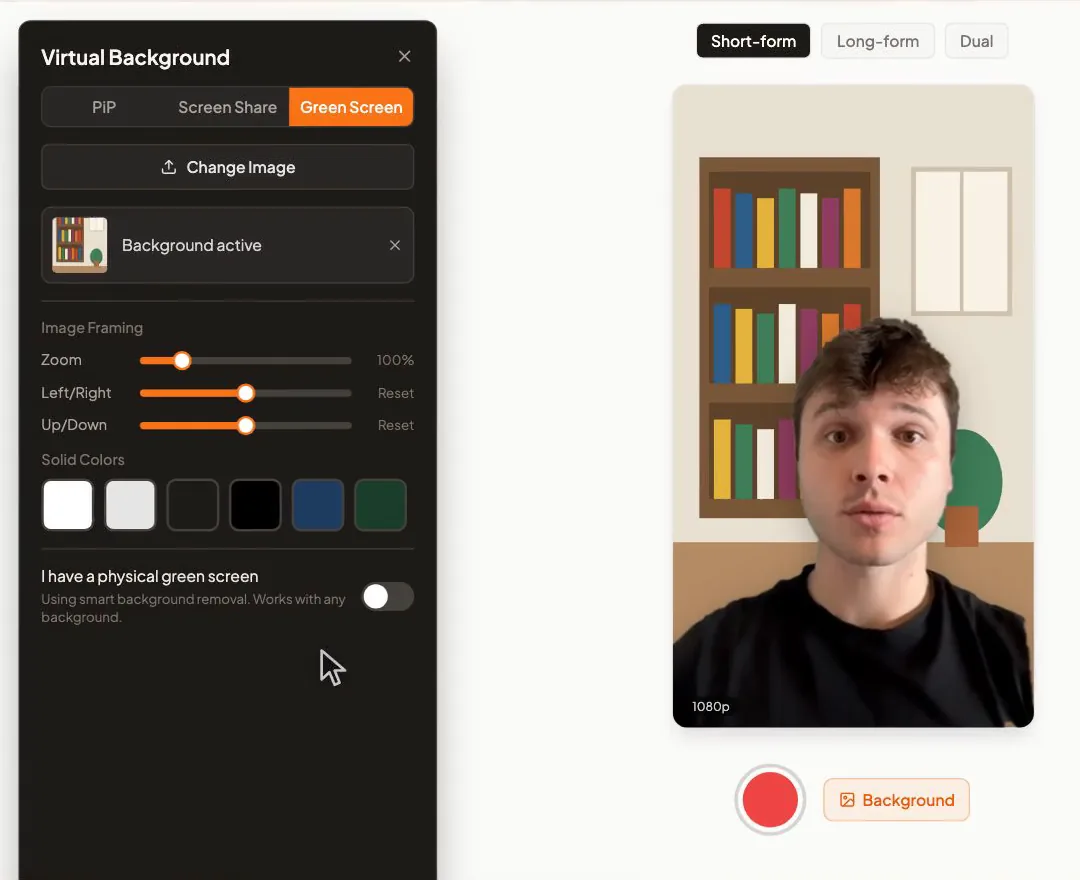
You can also key live while you record. Zoom does it with an "I have a green screen" switch, and CreateSocial's recording studio does it too. Click Background, choose the Green Screen tab, switch on "I have a physical green screen" and pick your background. You see it behind you as you talk, and your recording comes out with it already in place.
Fix green spill, shadows, wrinkles and hair edges
Most problems show up in your first test clip, and each has two fixes: one on set and one in the keyer. Switch the keyer to its matte view first. Premiere's Output menu and Final Cut's Matte button show the key in black and white, so problem areas jump out.
| Problem | Usual cause | Fix it on set | Fix it in the keyer | Source |
|---|---|---|---|---|
| Green spill: a green tint on your shoulders, hair and face edges | Light bouncing off the screen onto you | Sit further back. Add a hair light. | Spill Suppression in Premiere, Spill Level in Final Cut, Shadow in CapCut | Adobe, Apple, CapCut |
| Shadows: dark patches that won't key out | Your own shadow, or weak or uneven screen lights | Light the screen on its own. Move away from it. | A Sample Color box over the patch in Final Cut. Tolerance in Ultra Key. | CapCut, Apple, Adobe Help |
| Wrinkles: lines or blotches in the green | Creases from storage, or a loose sheet | Pull it tight with clamps or a frame. Check the care label before ironing. | Tolerance in Ultra Key widens the green it removes. | Elgato, Adobe Help |
| Hair edges: a halo or a chewed outline | Green shows through fine strands, and spill tints them | Add a hair light. Keep your hair color well away from the screen color. | Edges in Final Cut. Choke and Soften in Ultra Key's Matte Cleanup. | Apple, Adobe Help, Zoom |
| See-through patches on you | Clothing with green in it | Change clothes, or switch to a blue screen. | Lower the strength. Ultra Key's Shadow control restores dark areas lost to spill. | Apple, Adobe Help |
| Fizzing edges that crawl from frame to frame | Grainy, low-light or heavily compressed footage | Add light. Record at your camera's highest quality. | Pedestal in Ultra Key filters out the noise. | Adobe Help, Adobe |
Checked against Adobe, Apple, CapCut, Elgato and Zoom help pages on November 2, 2026.
In CreateSocial, the Removal strength slider handles the two most common cases. Slide it toward More if green is leaking through, and toward Less if your face starts to look transparent. The studio also reminds you to avoid wearing green the moment you switch the screen on.
Pick a background that could really be behind you
A boring background beats a clever one. A beach or a sci-fi set behind a coach invites the viewer to study the trick instead of listening. It also costs you every week. In my video on why AI makes showing your face matter, I warn against a super-edited, cinematic look, because "if it's hard to repeat, then it's hard to keep up with when it doesn't get results." A plain wall in your brand color keeps the attention on what you're saying.
Adobe's guide shows why the clever ones fail. Holtz's warning is about light direction: sunlight from the left in the background shot, your light from the right, and "there's no way to make those two things look right." Every lamp and window in a busy background is another direction to match. A solid color has none. For a close-up, Adobe also suggests making the new background slightly soft, the way a real wall behind you would be.
Three backgrounds that work behind a talking head:
- One solid color from your brand palette.
- Your brand color with your logo off to one side, clear of your head and shoulders.
- A soft photo of a real room, lit from the same side as your main light.
Use an image the same shape as your video, wide for a wide video, so the crop doesn't cut off your logo.
Or skip the green screen and get cut out of your real room
You can replace your background with no green screen at all. Software finds your outline in an ordinary room and swaps out everything behind you, the way Zoom's virtual background does.
Which should you pick? If you record in the same chair every week and like a setup you never touch, hang a screen. It works on your Zoom calls too, and a teleprompter for Zoom keeps your notes near the lens. If you record in more than one room or travel a lot, skip it. A video in front of your bookshelf beats no video.
Light for the cutout the way you would for a screen. Zoom recommends lighting "not only your face" but some of the background too, because the contrast helps separate you from it. A plain wall in a color that contrasts with your hair and clothes helps as well.
In CreateSocial's studio, leave "I have a physical green screen" switched off. We cut you out of your real room automatically, and the panel tells you it works with any background. Pick a solid color or upload your own image, then set it in place with the Image Framing sliders.
How CreateSocial gives you a clean background and a full content week
CreateSocial helps coaches, consultants and founders build a personal brand that brings in clients, speaking gigs and customers, without content taking over the week. It learns what you know, then runs the whole content week with you: ideas, scripts, written posts, recording, editing, thumbnails and scheduling. The background is one button in its recording studio. Here's the week around it.
- A clean background without a studio. Click Background and open the Green Screen tab. It keys out a real screen, with a Removal strength slider, or cuts you out of your room with no screen at all. Choose white, light gray, dark gray, black, navy or dark green, or upload a backdrop with your logo and place it with the Zoom, Left/Right and Up/Down sliders. The PiP tab puts your camera in a circle or a rectangle over an image, and Screen Share puts it in a bubble over your screen.
- Know what to say before the lights go on. Your website, past videos and client stories go into your knowledge base, which turns them into 80 personalized ideas a month with hooks, talking points or full scripts. Trending Now adds what your niche is talking about every Monday. Competitor tracking brings in new posts from profiles you follow, and "Ask me first" asks you questions so the script carries your real story.
- Record in sections, read off a teleprompter. The teleprompter sits near your camera and scrolls by hand or at a speed you set. Each answer is its own section with one-tap retakes, so a stumble costs you one section. Dual mode frames 16:9 and 9:16 in a single take.
- Edit by deleting words. Delete words from the transcript and they're cut from the video. Remove Silences in one click, correct your eye contact, add subtitles in 11 styles and drop in B-roll from free stock video. Here's where B-roll goes in a talking-head video.
- Turn one recording into a week of posts. On a video of 8 minutes or more, Find Clips picks out the moments that stand alone. The same video becomes LinkedIn posts, X threads, blog posts, emails and LinkedIn carousels with PDF and PNG export, and YouTube thumbnails come from your video and photos of you.
- Schedule it once. Schedule to TikTok, Instagram, YouTube, LinkedIn, Facebook and X with a caption written for each platform, and we post it for you once your accounts are connected.
Also in the one plan: the iPhone app for recording away from your desk, written posts with no video at all, reaction videos in Layout or Stitch mode, platform safe-zone guides for TikTok, Reels and Shorts, and an Analytics page with followers, views, likes, comments and shares for your connected TikTok, Instagram, YouTube, LinkedIn and Facebook accounts.
You also get a founder who answers. I'm Ben Moore, and I built CreateSocial on my own, bootstrapped, here in Cincinnati, Ohio, so you talk to me directly. Feature requests come to me, and a lot of what customers ask for gets built. Before CreateSocial, my agency generated millions of followers and millions of dollars in revenue for its clients, and I've generated hundreds of millions of views.
It's $129 a month, or $99 a month billed annually, with no add-ons and no per-feature charges. Start your free trial and record your first video in front of your new background today. Want a content plan built around your offer first? Book a free strategy call with me.
Record a 30-second test before your first real video
Test the setup before a real recording depends on it.
- Hang the screen and pull it tight.
- Put your chair as far out as the room allows, and tape its spot on the floor.
- Turn on the screen lights, then your own. Check for one flat shade of green on camera.
- Switch off auto exposure, white balance and focus.
- Record 30 seconds, moving your head and hands the way you do when you talk.
- Key it, switch to the matte view, and fix whatever shows up using the table above.
Then leave it all where it is. Next recording day starts the moment you sit down. A free CreateSocial trial gives you the green screen keying, the teleprompter and the ideas for that first real video.
Questions people ask
How far should you stand from a green screen?
As far as your room allows. Adobe's green screen guide says to aim for 10 to 15 feet. Distance keeps green light from bouncing onto your shoulders and hair, and it keeps your shadow off the screen.
What is chroma key?
Chroma key is the technique of making one color in a video transparent so another image shows through behind you. Green is the usual color because it does not match natural skin tones or hair.
Why are green screens green?
Green does not match any natural skin tone or hair color, so a keyer can remove it without taking pieces of you with it. If you need to wear green or show a green prop, a blue screen works instead.
What software do I need to use a green screen?
Any editor with a chroma key tool. Premiere Pro has Ultra Key, Final Cut Pro has the Green Screen Keyer, iMovie has Green/Blue Screen and CapCut has Chroma Key. Zoom and the CreateSocial recording studio can also key a green screen live while you record.
How do you use a green screen on an iPhone?
Record your clip in front of the screen, then open iMovie. Add the background clip to the timeline, add the green screen clip, tap More and choose Green/Blue Screen. Tap Auto or tap the green to remove it, then use the Strength slider to clean up the edges.
Should I use a green screen or a blue screen?
Green suits most people. Use blue if you want to wear green or have something green in the shot, which is what Apple's iMovie guide recommends too.
Can you use a virtual background without a green screen?
Yes. Zoom's virtual background and the CreateSocial recording studio can cut you out of an ordinary room with no screen behind you. Light your face and some of the wall behind you, which Zoom says helps separate you from the background.